
Electric Kiln Loading and Basic Maintenance
/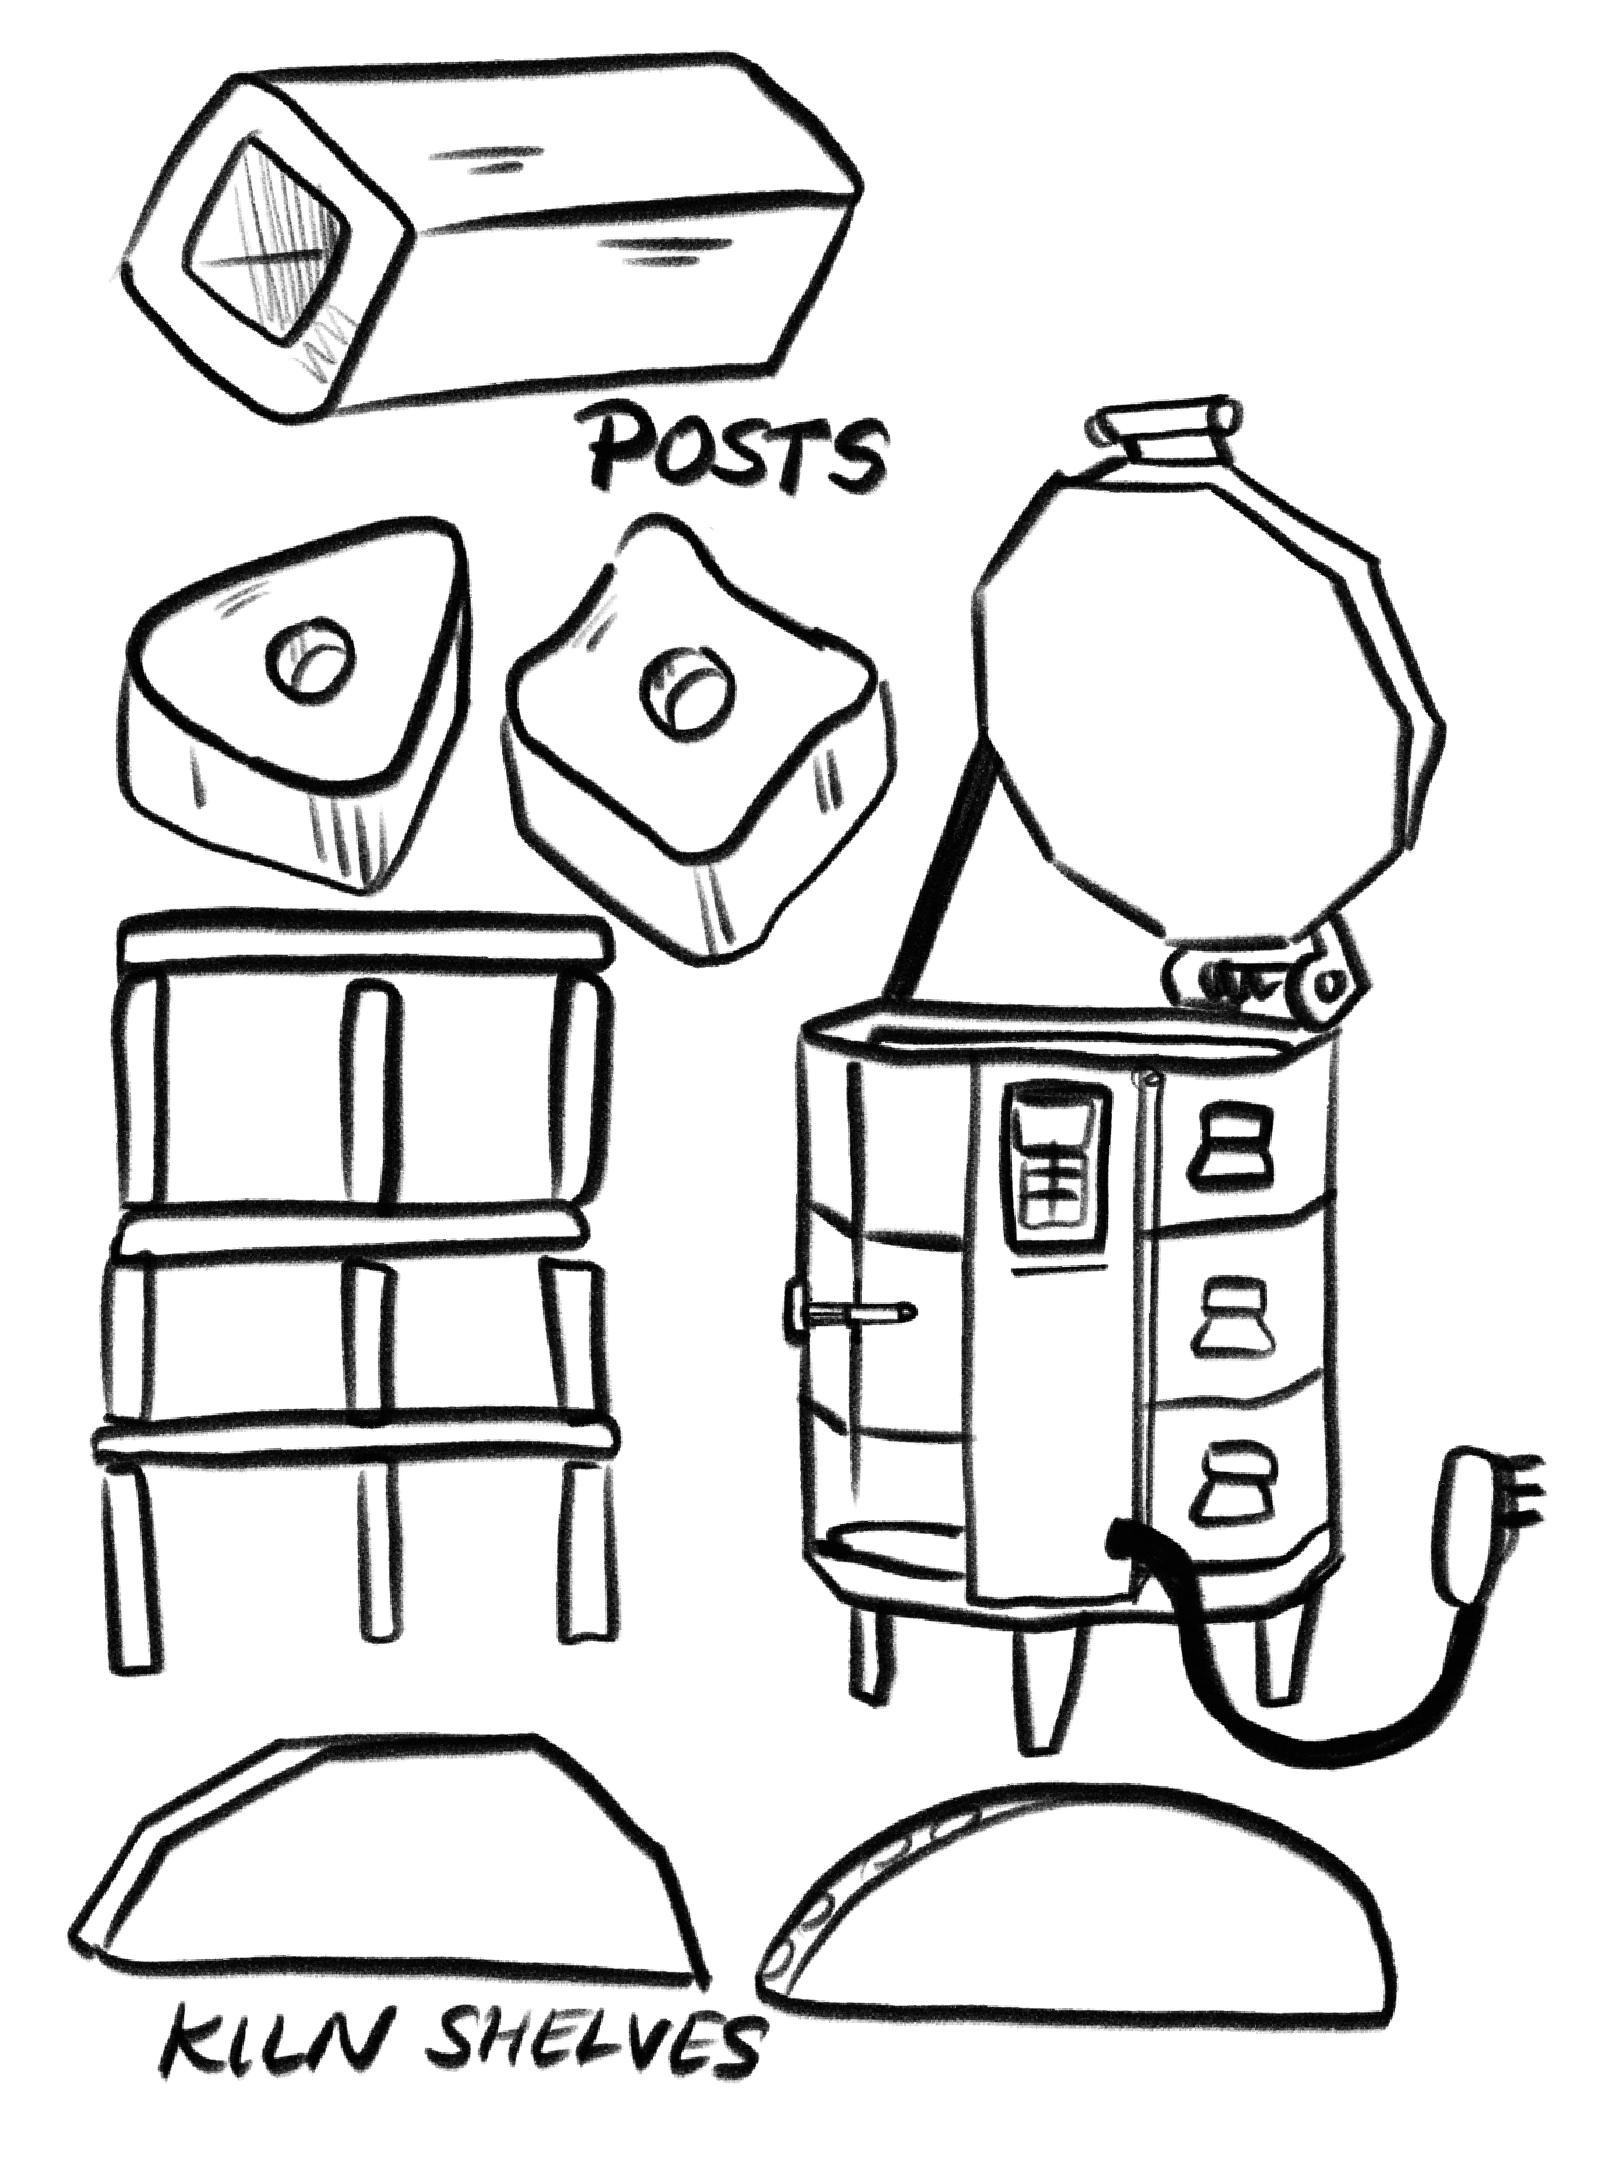
Kiln Furniture comes in different sizes of shelves, posts, and materials. For ease of loading, try to collect the same types of furniture.
Loading Tips for all Firing Types
So you’re ready to load a kiln! Whether this is a bisque, glaze, or otherwise, here’s some tips for how to do so successfully.
The base layer of kiln shelves should be 1” from the softbrick.
Begin loading with at least a 4-5” height post and work.
Posts should be placed directly above any posts on the shelf below.
Work can touch and stack together in a bisque kiln.
Try to fit as much work as possible for an efficient firing.
Organize and load work by the same height for best use of space.
Start loading from the outer edges of the shelf, and move inside. Avoid creating large gaps, and fill small spaces with small works.
Stagger the height of shelves, load shelves with different heights for good heat flow. Too many short or tall shelves can cause the kiln to under fire.
Leave space above and around the thermocouple - the space equivalent of a tennis ball of empty area around the thermocouple.
When picking up and lifting objects, always use both hands for safety.
Try not to fuss, and be thoughtful about placement. Repeatedly moving an object increases the likelihood of bumping handles or dinging rims. Sometimes you need to just be done where you’re at with the shelf and move on!
Always have proper ventilation in your firing space, and protect your kiln from rain or other weather.
Loading A Less-Than-Full Kiln
Firing partially empty kilns is a waste of energy, and can sometimes affect the way your (glazed) work fires, and the length of the firing! Wait until you have a full kiln load before firing to make the most of your kiln and electricity.
If you MUST fire a partially empty kiln, space out the work. Stack the kiln accordingly by spacing out items to allow for proper airflow.
Loading A Bisque
Load bone dry pots only, or close to bone dry.
Loading wet work can increase the chances of explosions.
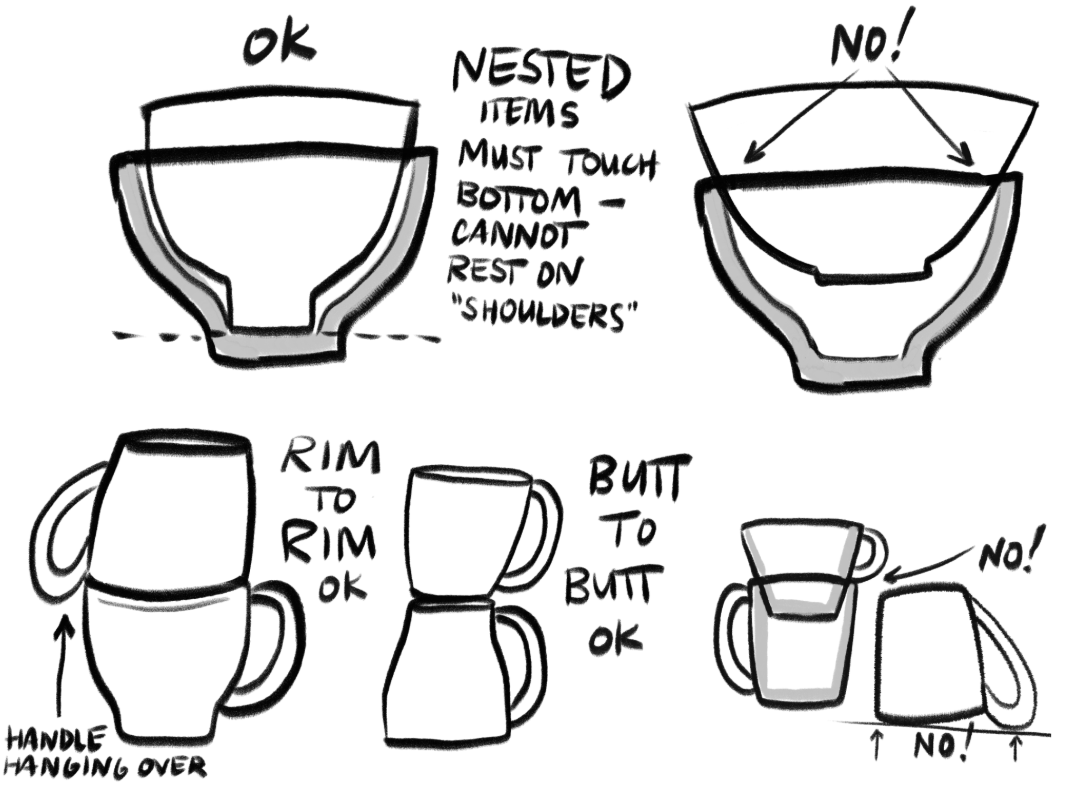
Pots can be stacked rim to rim, butt to butt, and nested in order to pack the kiln tight.
Pots cannot nest without room to shrink - objects loaded like the bowls (right) below will shrink together and become stuck after bisque.
Avoid resting items on fragile attachments like handles and decorative elements.
Successful stacking will be stable. Objects should not tip, wiggle, or feel precarious if the shelf were shaken.
Large items can be loaded on their side if they do not fit vertically.
Sometimes items cannot all fit on a shelf - it’s acceptable to split the height of shelves, but it’s recommended to do this towards the top ½ of the kiln to maximize loading efficiency.
Avoid hanging pieces too far off the edge of the shelves - they should be sitting at least 70% on the shelf.
What NOT To Load into a Bisque
Wet work
Pots that are too thick (relative to their size) - items should generally not be thicker than ½”
Sculptures that don’t have air holes
For thick sculptures, use a ramp/hold schedule that includes extra drying time
Glazed greenware, stacking pots with stroke n’ coat, or any glazed items
Tumble Stacking
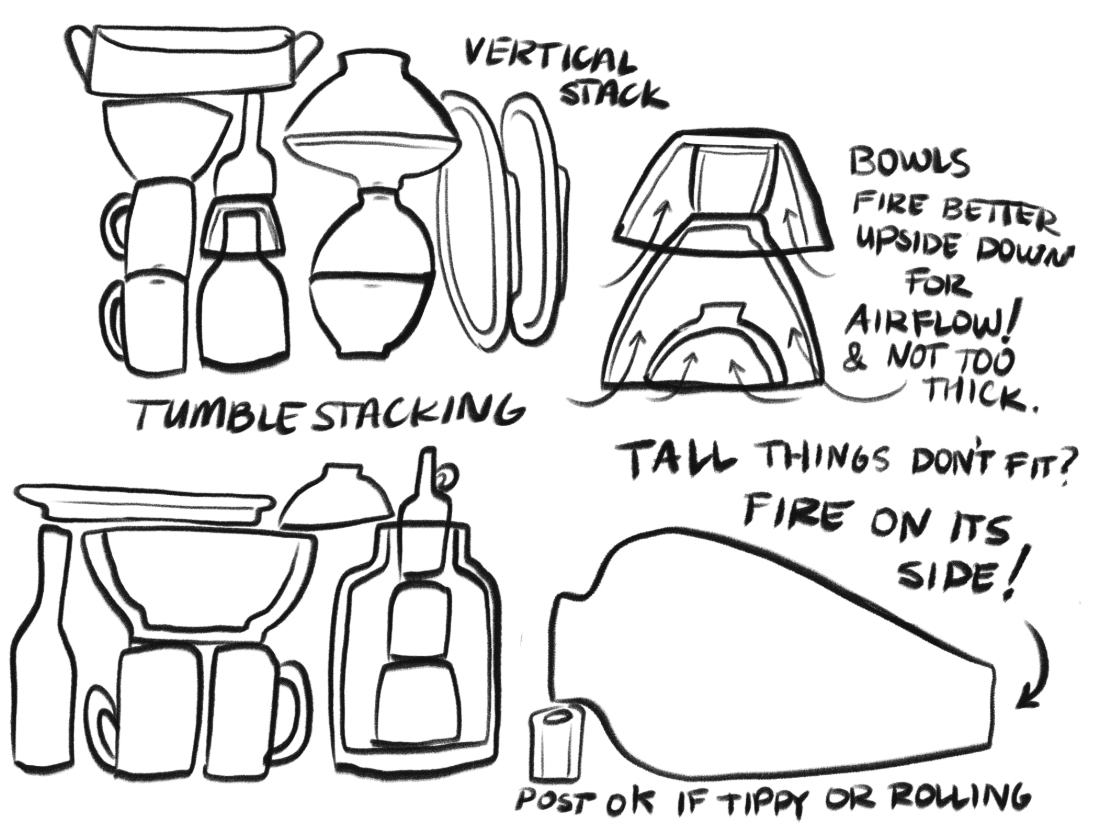
Items can be loaded vertically, on their side, or across other items!
Tumblestacking takes time to build confidence, but is very helpful for tight kiln loads.
Firing items vertically or on their side does not contribute to slumping - issues with slumping appear during the glaze firing. Common reasons for warping/slumping include pieces being repeatedly squeezed, changing the shape while the piece is already leather hard, or improperly sized feet.
When loading items that are nested, consider the overall thickness - if nesting multiple bowls inside of each other, there ends up being 1-2” of clay touching which can contribute to explosions without enough airflow.
Firing A Bisque
Most firing programs include 2-4 hours of “candling” time, which helps pottery dry out.
Program the firing, and add a delay if desired.
Make sure to hit START, and watch for the countdown of the delay, or to hear the clicking of the kiln relays.
Put peeps in, leave the top peep out to allow off-gassing of any organic materials.
Turn on Envirovent or overhead ventilation if present.
Be present for the end of the firing to ensure the kiln fires off successfully, or use a camera!
Never set anything on top of the kiln - this is a major fire hazard, whether or not the kiln is firing.
How To Load a Glaze Kiln
Pots cannot have glaze on the bottom, or ¼” from the foot.
Glazes should not be cracked or flaking.
Pots should be stable, and able to sit flat without rocking/leaning precariously.
Pots should not touch or stack in the glaze firing, and must have at least a credit card’s width of space between them, and the walls/elements of the kiln.
For risky runny glazes, use a cookie.
Unloading the Kiln
Wait until the kiln is room temperature before opening/unloading work.
Opening kilns before 300ºF is risky and can damage your work, cause unnecessary wear on the shelves/elements, and can cause burns without heat resistant gloves.
Unload layer by layer, and put kiln furniture back appropriately.
Be careful not to hit the thermocouple during unloading.
Clean shelves and posts after use so they are ready to use for the next kiln loader.
Vacuum out kiln if there is any debris from an explosion (Be careful not to touch the thermocouple with the vaccuum nozzle! this can cause static shock, which will fry the computer.)
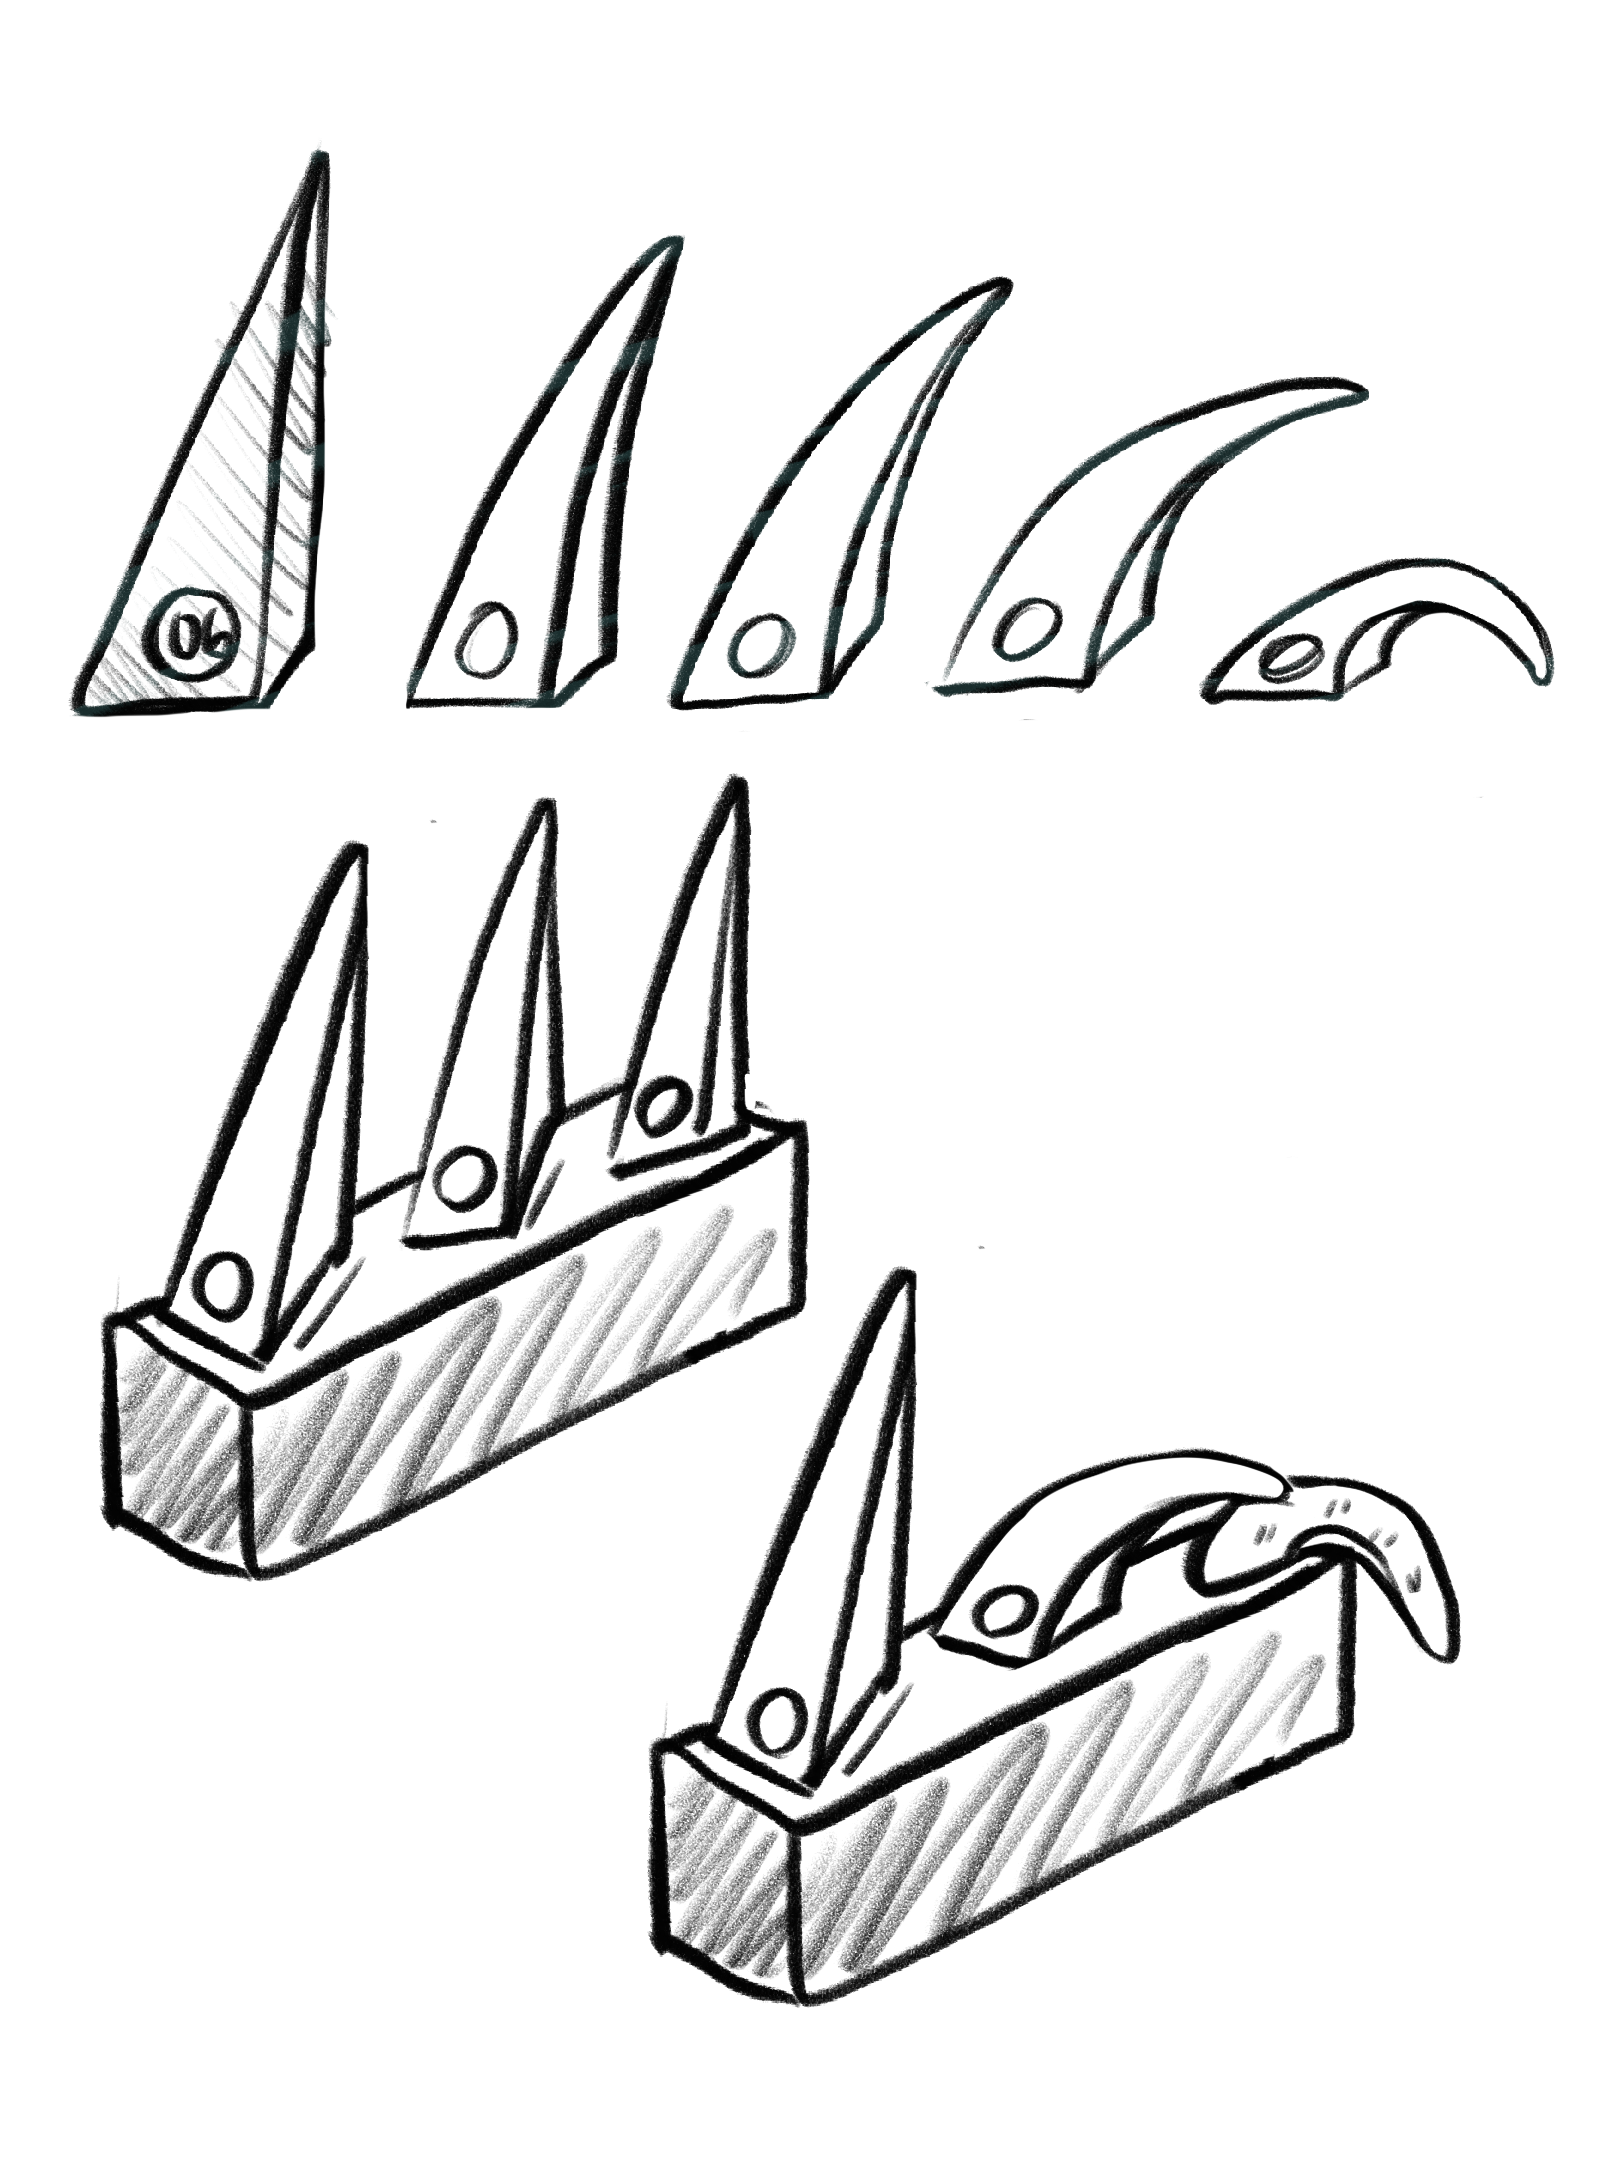
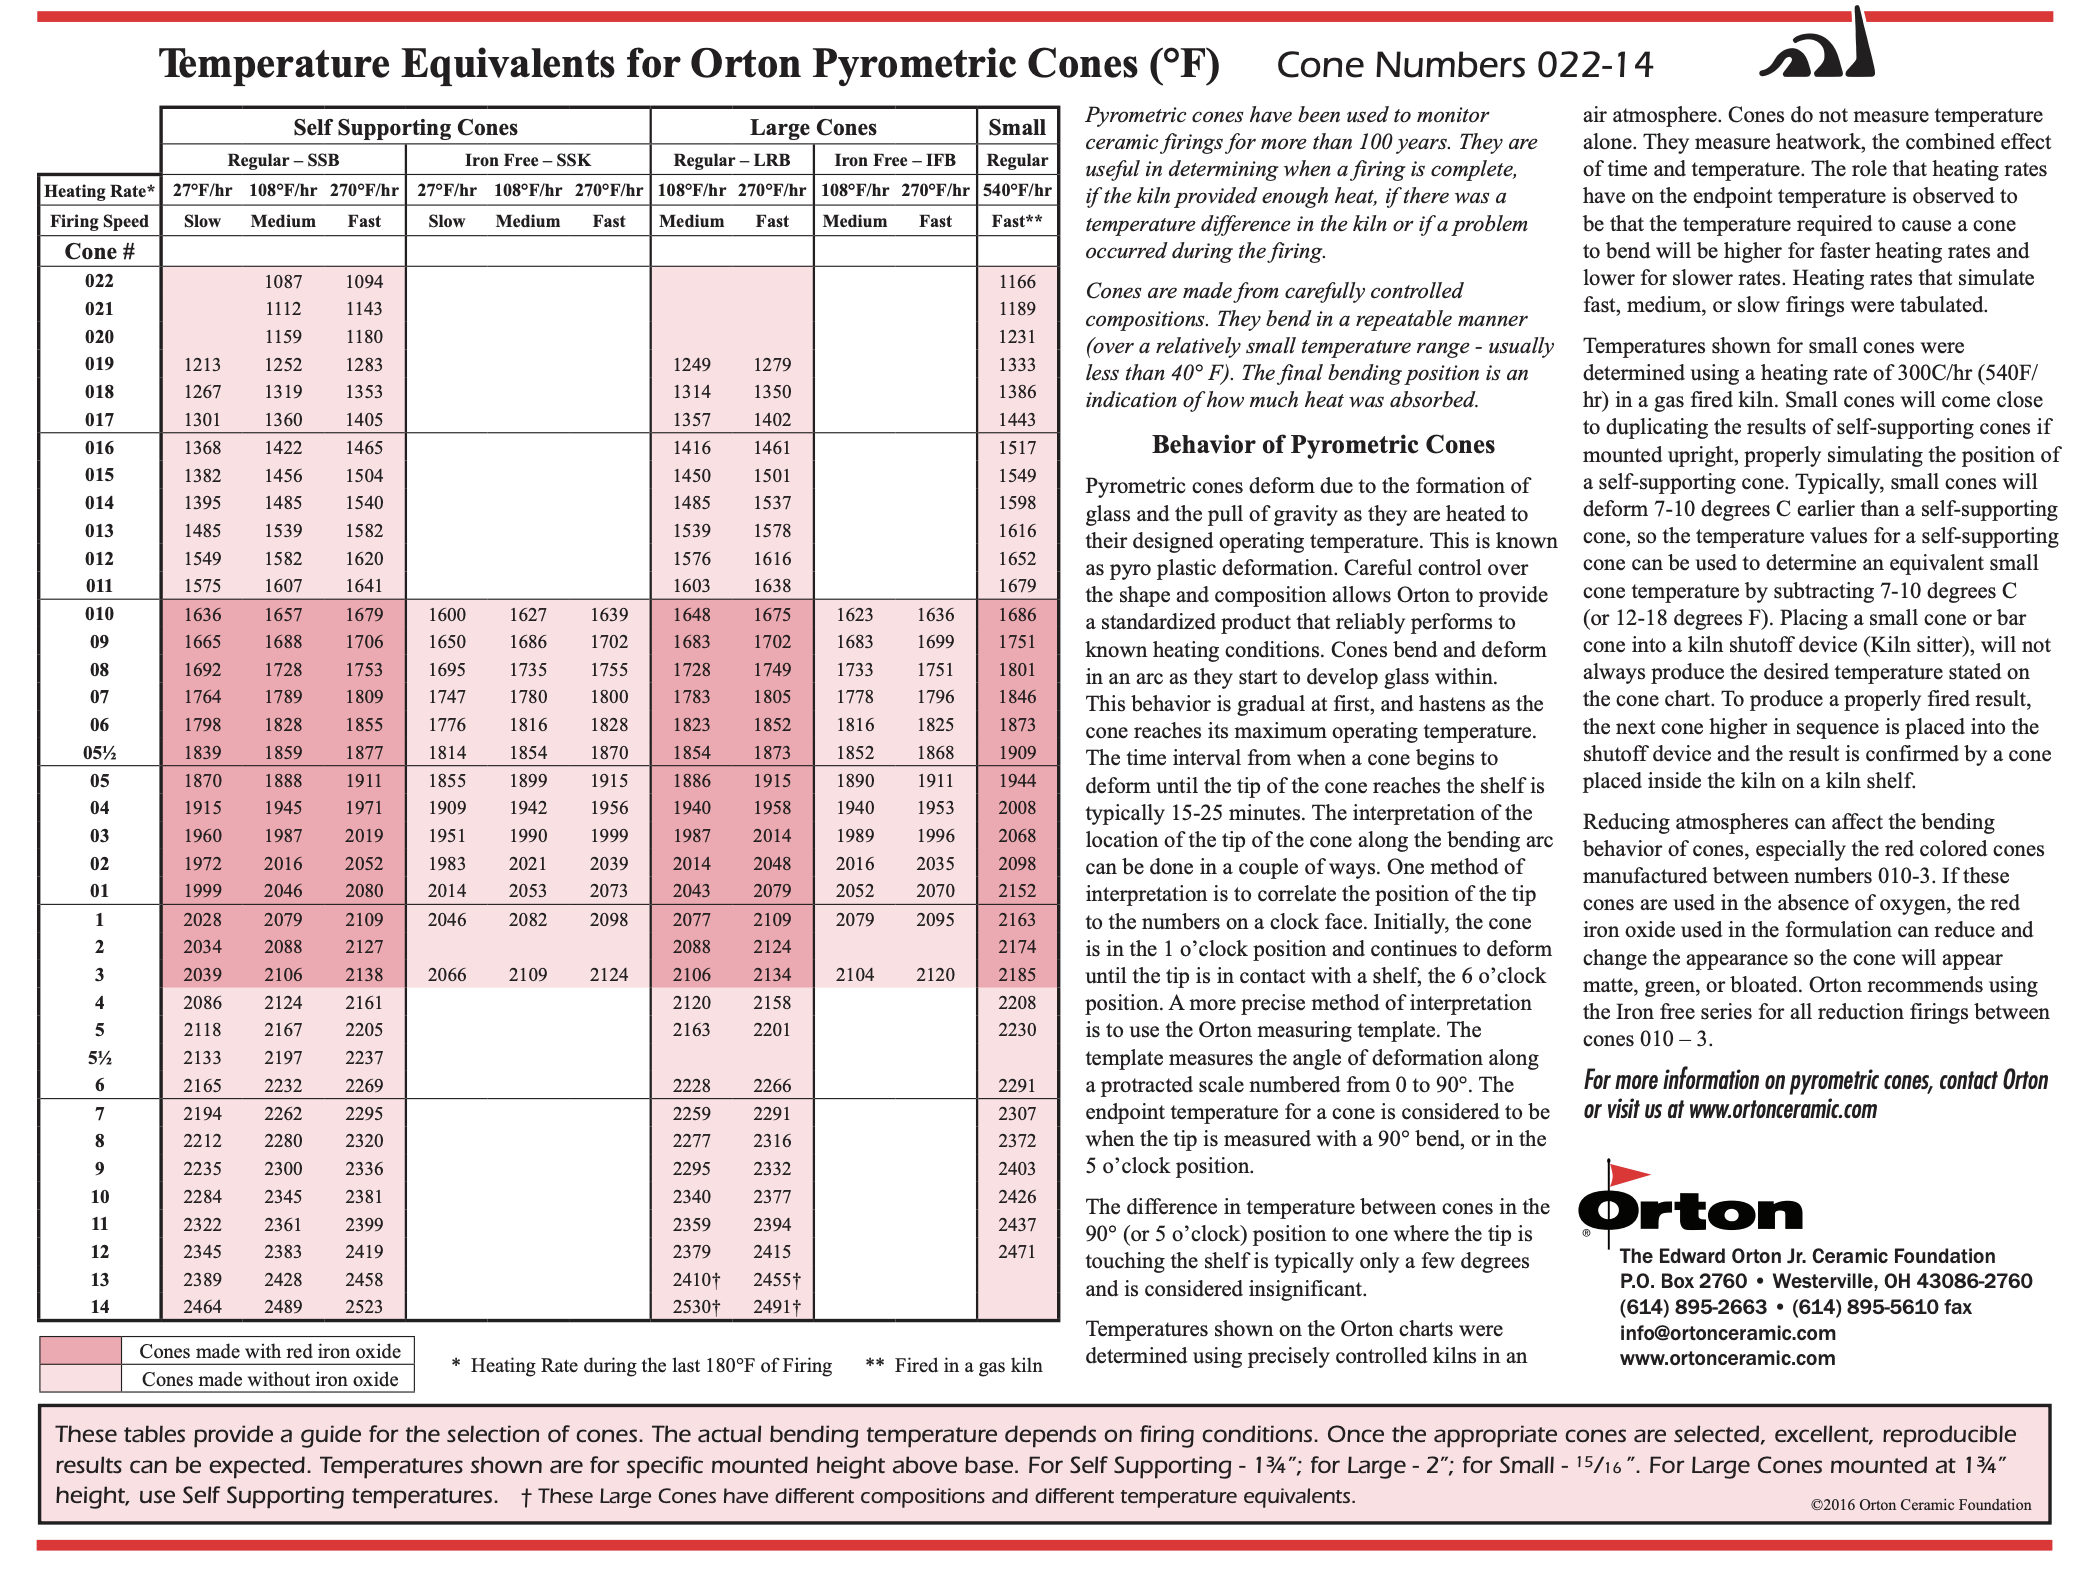
What is a Cone? (also read as ∆ or ^)
Pyrometric Cones are a measurement of heat and time enacted on a piece of clay. This is called HEATWORK. They are a true measurement of temperature, and are helpful in case of computer failure or error. Cones get soft and bend as peak temperature is reached. Once they are bent and touching the shelf, that cone has been reached.
It’s recommended to place a witness cone inside the kiln on the shelf in front of the peep as a backup to ensure that your kiln does not over fire. See the Orton Pyrometric Cone Chart handout for more information.
Cone Packs
How to make a cone pack for your firing - Ceramic Arts Daily Resource
The Guide Cone: One cone below the target or firing cone. This gives a warning that peak temperature is near. In a cone six glaze firing this would be a cone 5.
The Target Cone: Used when double-checking an exact temperature alongside the guide cone. The cone for your target temperature. When this cone bends over perfectly, your kiln has reached the ideal maturity point. In a cone six glaze firing this would be a cone 6.
The Guard Cone: A cone with a higher temperature rating than your target. If the guard cone bends over, you know the kiln has overfired or gone too hot. In a cone six glaze firing this would be a cone 7.
More resources on cones
Orton Cones (Download PDF of Orton Cone Chart)
Orton Website with loads of info on reading cones
Digital Fire - Pryometric Cones
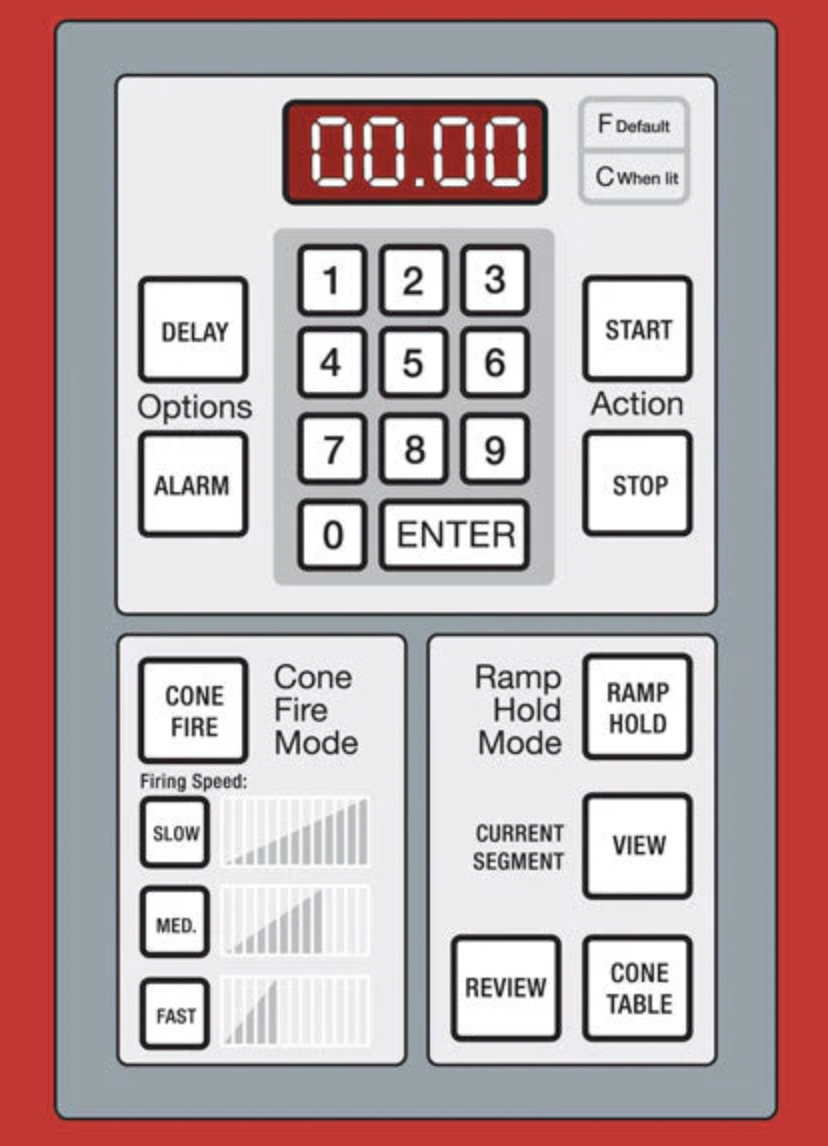
Programming Your Electric Kiln
Pre-programmed Firings:
You can choose to use the kiln’s preprogrammed Slow or Fast firings, or program a custom ramping schedule. Make sure that you are entering the correct Cone, or end temperature. ∆06 and ∆6 are different temperatures. ∆06 (Bisque) is 1818˚F, and ∆6 (Glaze) is 2185˚F, but this can vary based on the size of the kiln, and if you add any additional holds.
Speed > Select your firing speed (Slow, Medium, or Fast) and press ENTER.
Slow: Recommended for large/thick pieces or heavy clay loads (takes ~10–12 hours).
Medium: Ideal for average-sized, well-dried pieces.
Fast: Best for decals, luster firings, or to test fire an empty kiln.
Ramp Hold Program
You can also program a custom schedule if your works benefit from holds at specific temperatures, or you need an extra slow candle! This is especially useful for controlled heating or cooling.
Ramp Hold > Enter specific program # (1-6) and press ENTER.
SEG (Segments) is the number of Ramps
Each Ramp can have a hold
Remember that the computer reads the clock as 00.00 (Hours.Minutes), so 5.00 is 5 hours, and 0.05 is 5 minutes. If you make a mistake, continue to hit 0 to clear the computer and try again.
More info about Kiln Schedules or Programs
Digital Fire - Kiln Programs
Kiln Controller
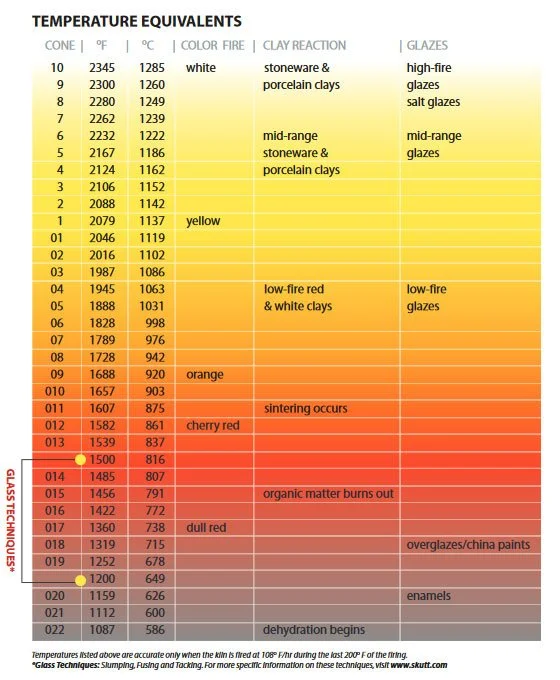
Important Kiln Temperatures
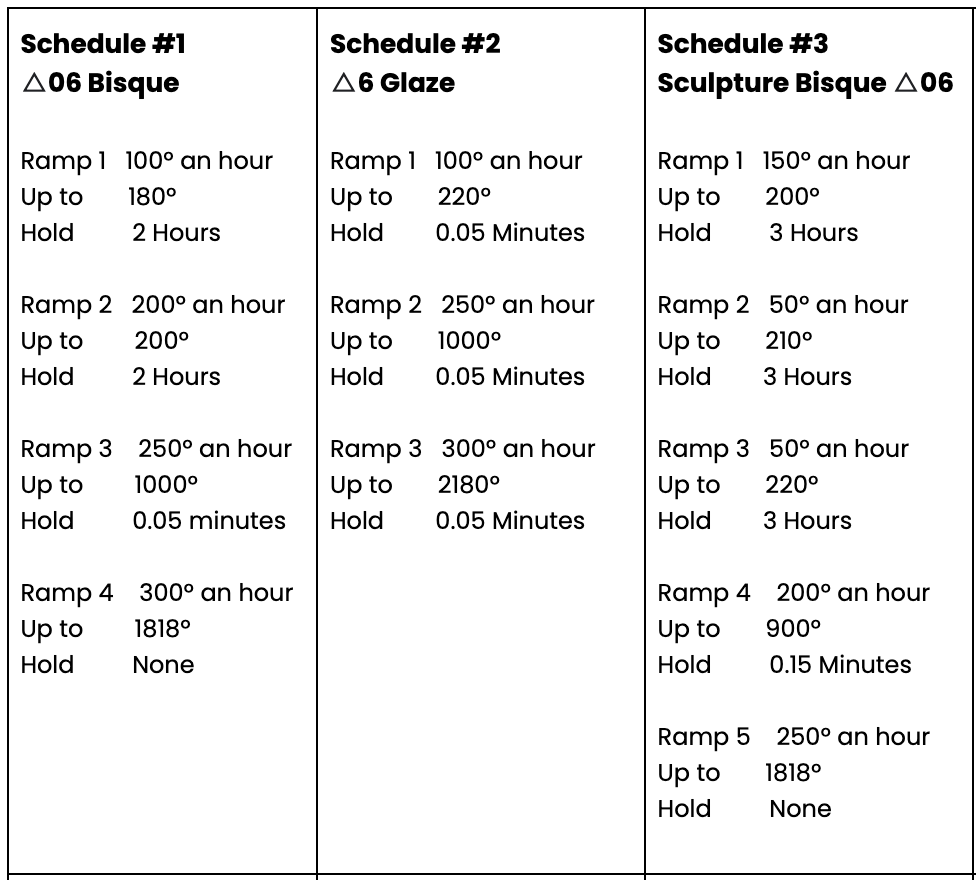
Ramp/Hold Schedules for BIsque, Glaze, and Sculpture Bisque.
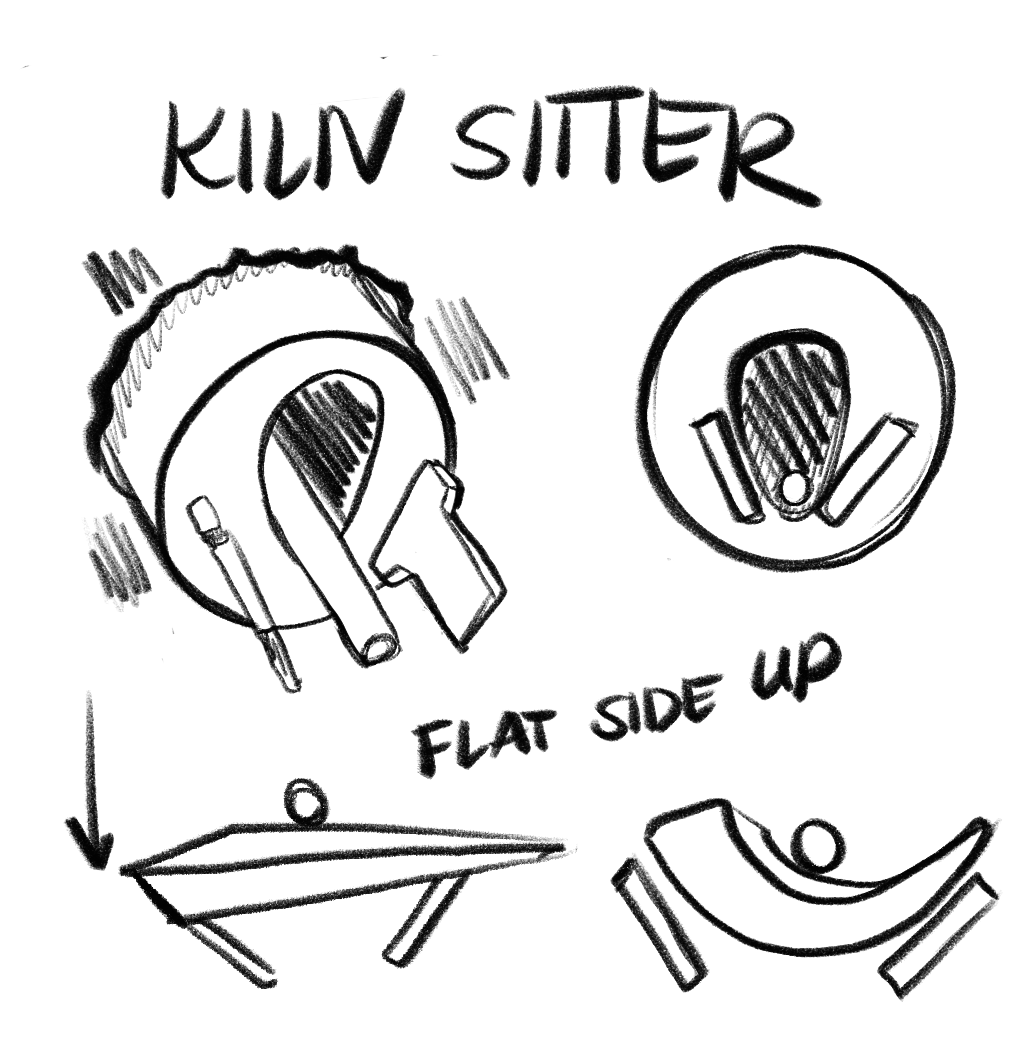
Manual Kilns: Kiln Sitters
Manual kilns utilize cones and timer to fire, and often have a knob with Low-Medium-High. Cones must be put in the correct direction in order to read correctly. If put in the incorrect position, it can cause firing malfunctions.
Many older model kilns have kiln sitters, and are a cost friendly option for a beginners kiln. It can be challenging to service kiln sitters, as many parts are no longer being manufactured.
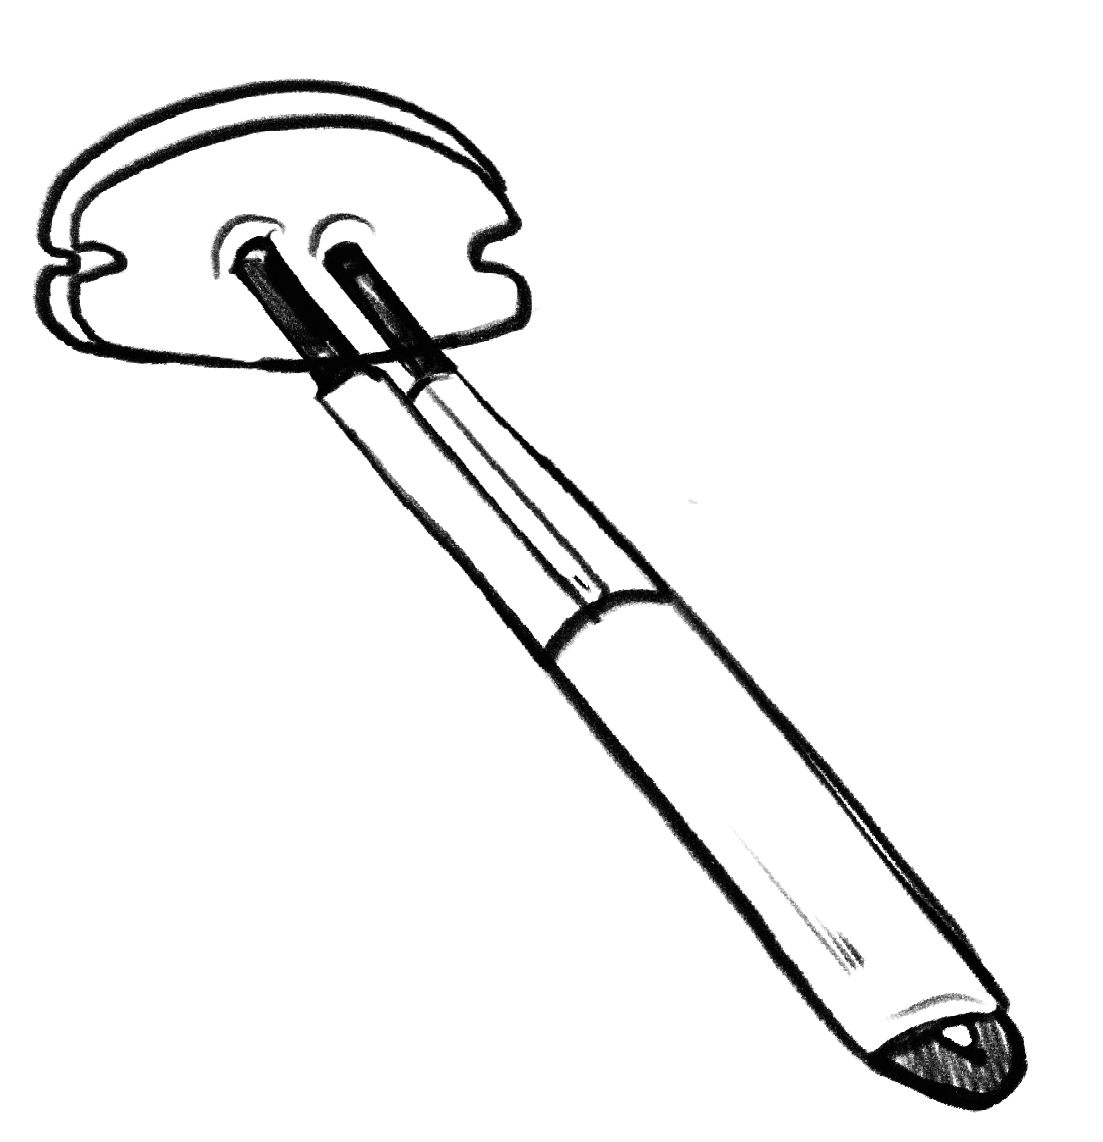
Thermocouples
What is a Thermocouple?
A thermocouple is a sensor that measures temperature. It goes through the softbrick of the kiln, and is connected to the controller box. The most commonly used kiln thermocouple is the K-Type. You do not need an S type unless your kiln specifically calls for this.
Be careful not to bump the thermocouple when loading/unloading.
A bent, cracked, or broken thermocouple will not read temperature accurately.
Do not touch the thermocouple directly with the vacuum when cleaning out debris. This will cause static shock to the controller, which leads to firing issues and an inability for the computer to accurately read temperature.
How to Maintenance / When to Change Your Thermocouple
It’s normal that the thermocouple will spall, or spit metallic flecks* after several firings. You can prolong the life of your thermocouple by brushing it with an old toothbrush to flake off any loose metal.
Thermocouples generally last about 60-100 firings. If you begin to see corrosion, breakage in the metal, ceramic casing, or changes in color (blue/green oxidation) on the thermocouple or the block, it may be time to change your thermocouple. Otherwise, the controller may struggle to read temperature, which can affect the accuracy of your firings.
* Avoid placing glazed work under or near the thermocouple in a glaze firing - you may see metal flecks fired into your glaze when unloading.
Changing a Thermocouple
Most kiln brands include instructions when replacing parts. Read and follow instructions according to the specifics of your kiln. You can contact your kiln brand tech support service for assistance via phone and email.
Make sure the kiln is empty, and at room temperature.
Turn off power to the kiln.
Unscrew the kiln controller box, place the screws in a safe place.
Unscrew the thermocouple block (the housing unit for the thermocouple).
Loosen the screws holding the thermocouple in place, do not remove them entirely.
Remove the old thermocouple, discard.
Replace with a new thermocouple, ensuring that the red (negative) side of the thermocouple goes in the appropriate side.
Tighten the screws until they are secure, do not overtighten as this can cause damage.
Replace the thermocouple block, close the kiln controller box, and screw back in.
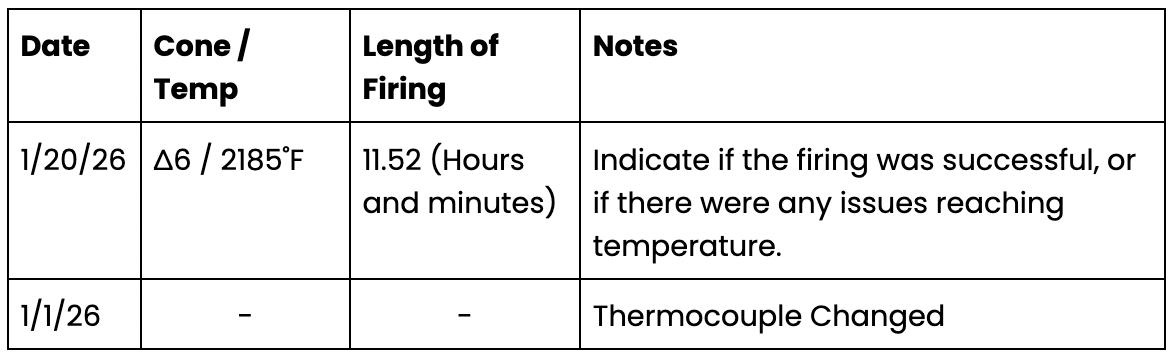
Keep a dedicated file or notebook for recording your results!
Recording Your Results
Keep a chart where you record each firing, the date, end temperature, and the length of the firing once complete. Record dates for when you have performed maintenance, or changed parts on the kiln.
Keeping a thorough record can prepare you for future maintenance, and will help prevent kiln failures!
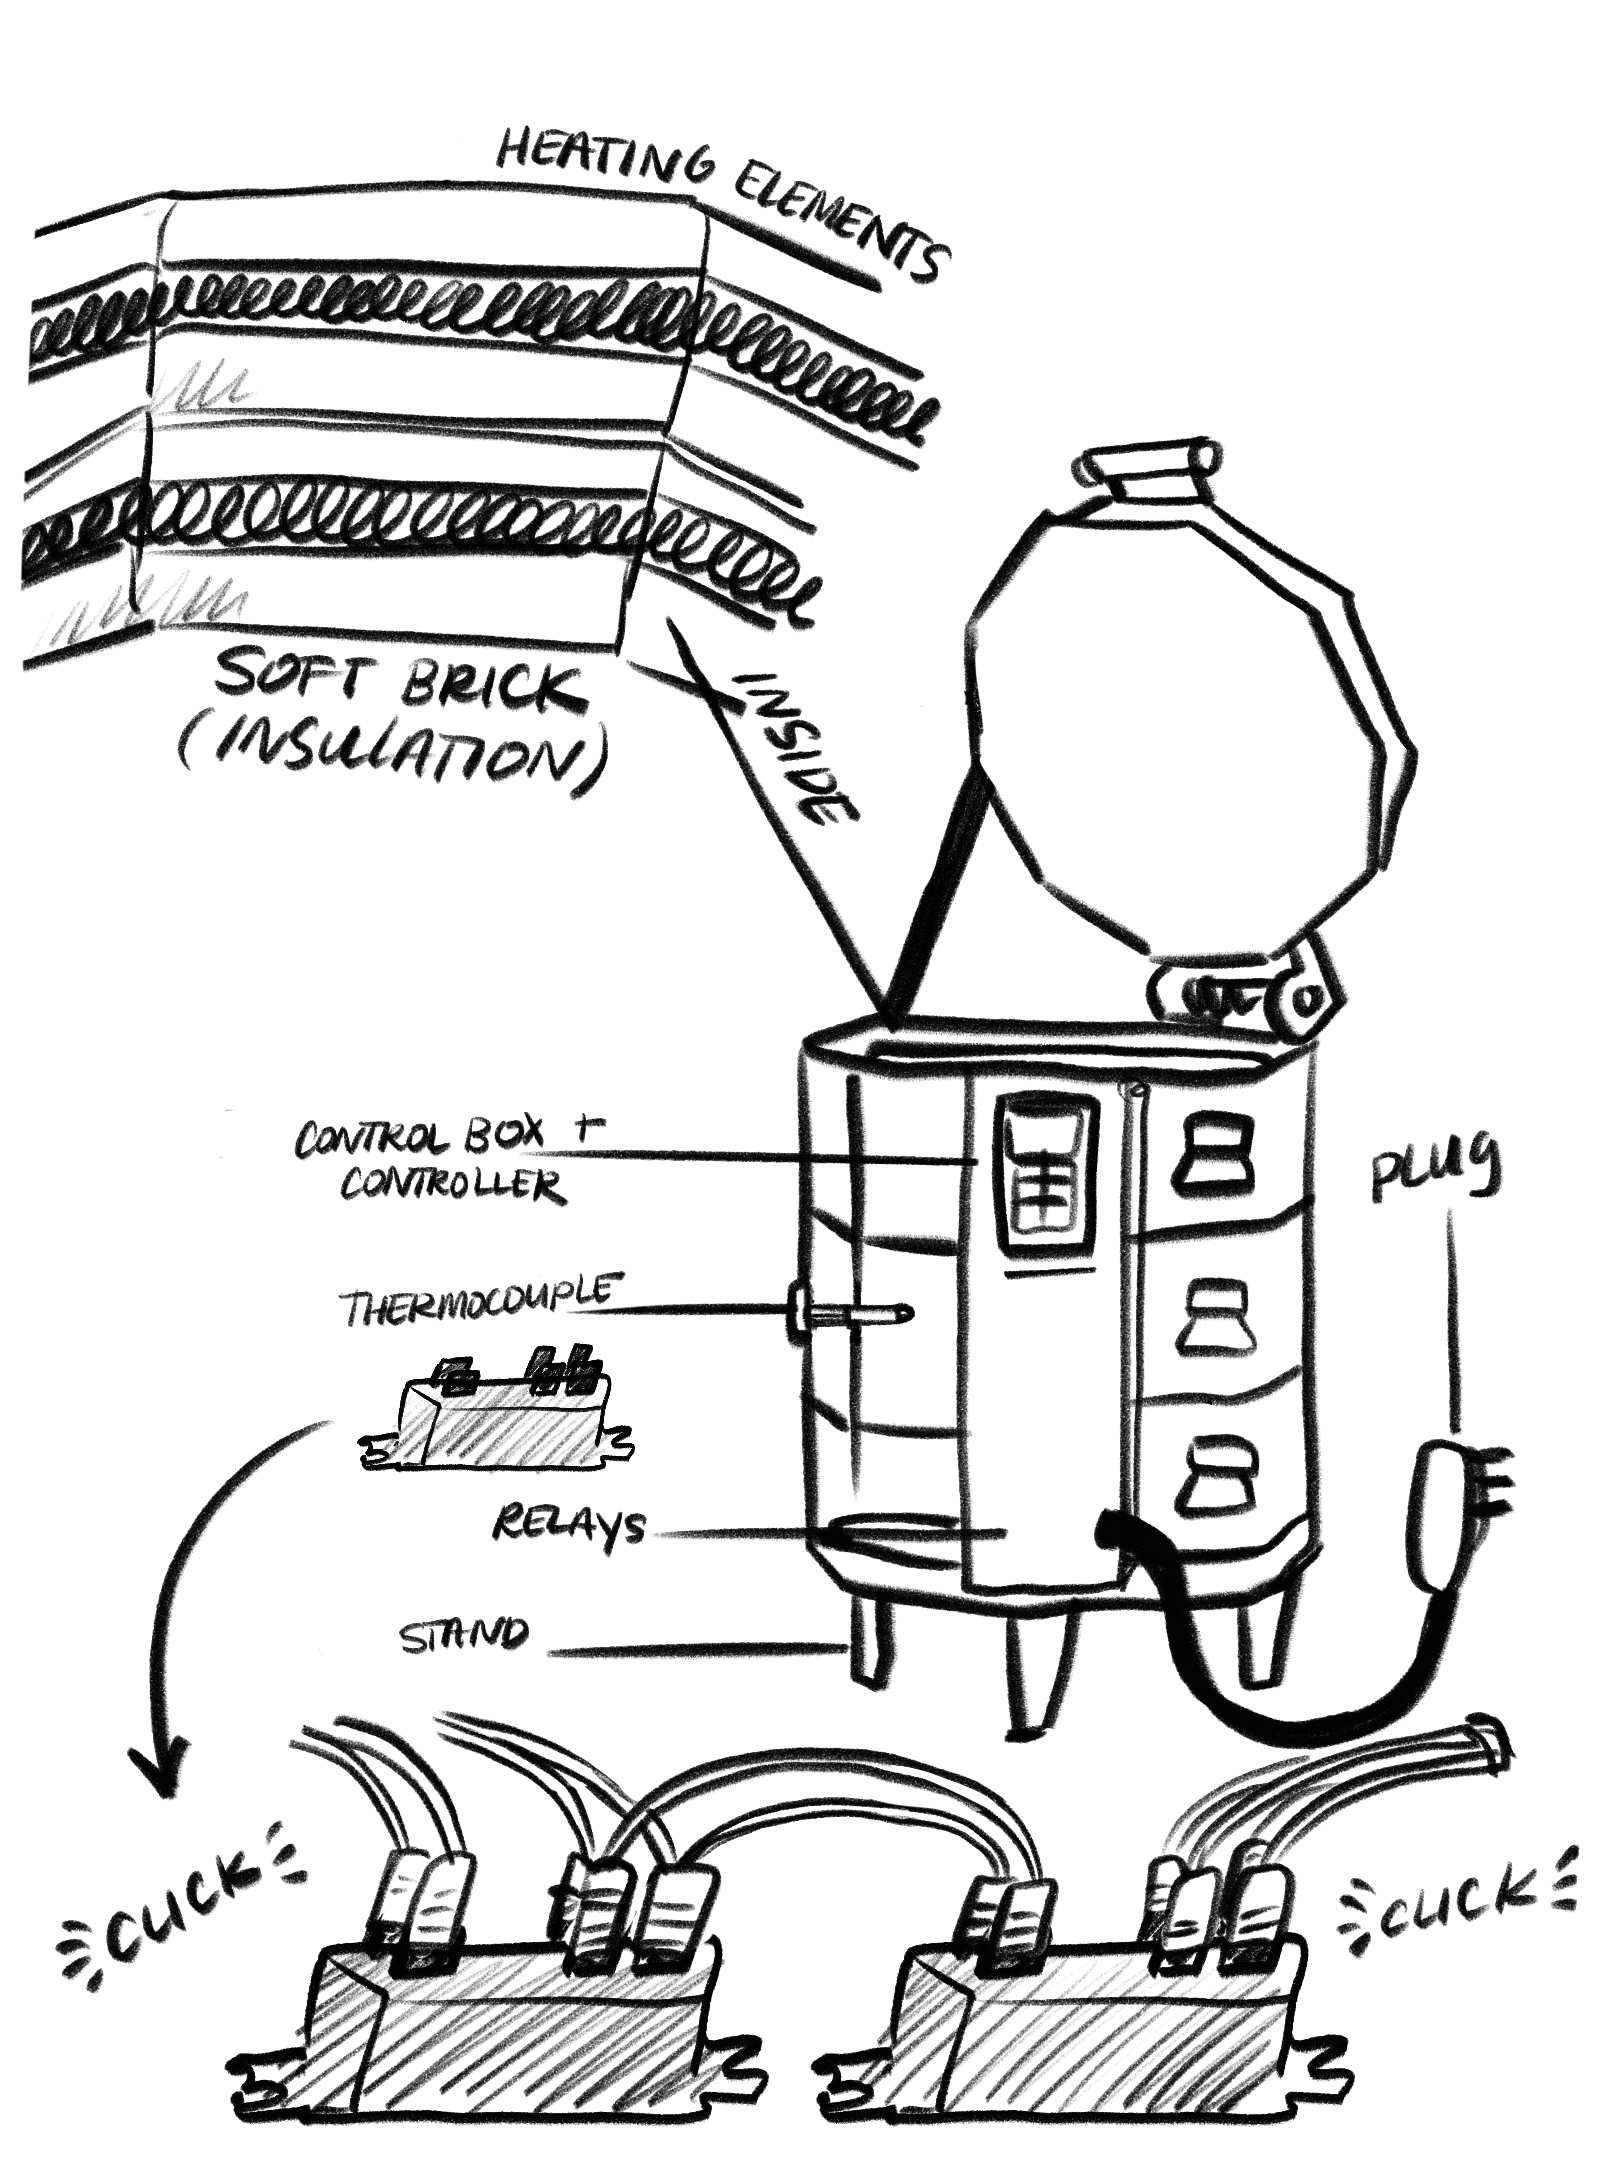
Parts of a Kiln
Soft Brick (insulation) - A thick layer of soft brick that lines the kiln. These begin to break down if they are repeatedly bumped or if damaged by glaze.
Heating Elements - the metal coils that heat up the kiln. These generally last 60-100 firings depending on the end temperature and if they sustain any damage.
Thermocouple - Reads the temperature in the kiln.
Relays - Located inside the controller box. They turn the elements on/off, and make a clicking sound while the kiln is firing. These connect the control box with the elements! They will wear out over time, and should generally be replaced with the elements.
Control Box / Controller - Programmable computer used to start the firing. Allows the relays and elements to communicate.
Furniture - Kiln shelves and posts used to load work into the kiln. Should be regularly cleaned between firings, and receive a layer of kiln wash to protect the shelves from drippy glaze.
ERROR / Error Codes
If your kiln reads ERR, don’t panic! Check the code!
Kilns can error for a variety of reasons, and in most cases, they are easily fixable, and your work will be unaffected. Bisque firings that fail can easily be refired unless the work was overfired. Glaze firings that error early can be fixed and continue firing or refire, but glazed works that fail to reach temperature between ∆06-6 can cause glaze defects or cracking. Sometimes this happens. :- (
Investigate the error code, and contact a technician! The easiest way to move forward is to call the manufacturer, and explain the situation. The more information you can give them, the better. They will be able to provide advice for how to repair, or diagnose, and can make the situation a lot less stressful if you need to order parts or figure out what your kiln needs in general.

This article was complied by Anika Major for a “Know Thy Kiln” one-day workshop at Rain City Clay. Drawings in this article are by Anika Major - Studio Manager at Rain City Clay!
May you and your kiln live a long, happy life together. 🔥